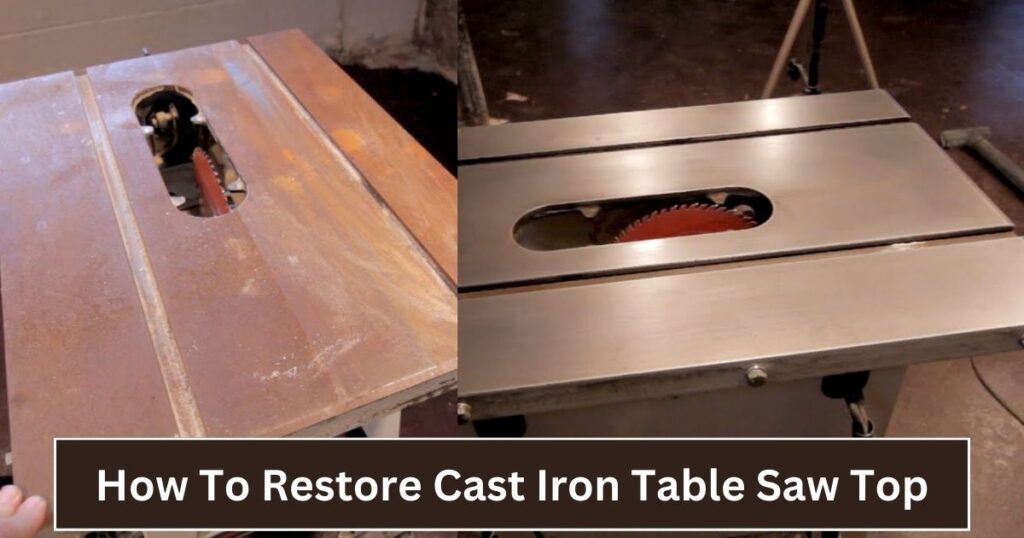
Embarking on the journey to restore a cast iron table saw top is like giving new life to a trusted companion in your woodworking endeavors. Over time, the wear and tear on the surface of your table saw can impact its performance, affecting the precision of your cuts.
In this guide, we’ll explore the step-by-step process of how to restore cast iron table saw top, transforming it from a weathered workhorse to a gleaming platform for your woodworking projects.
As any seasoned woodworker knows, the table saw is the heart of the workshop, and ensuring its top is in prime condition is essential for achieving accurate and smooth cuts.
So, let’s dive into the hands-on process of bringing back the luster and functionality to your trusty table saw surface.
Step-by-Step Guide On How to Restore Cast Iron Table Saw Top:
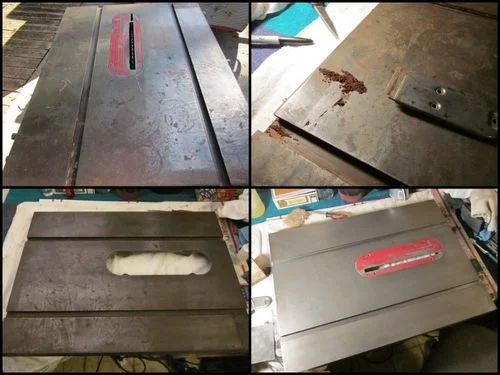
Step 1) Cut Off The Rust:
First, take off your blade insert, blade, fence, miter gauge, and anything else that is attached to it. The rails that your fence rides on can also be taken off if you want to. In my case, they didn’t need much care anyway.
Scrape off the high spots of rust with a putty knife or something similar. This will make everything flat. As you scrape, don’t try to cut into the metal. All you want to do is get rid of the free rust. It’s important not to scratch the surface; you want it to be as flat and smooth as possible.
Step 2) Use a Rust Remover:
After getting rid of the free rust, it’s time to use a rust stripper. There are a lot of other items out there besides the one we used from Rust-Oleum. This kind of product is usually called “Naval Jelly,” and you can find it at most hardware and auto shops.
Put on gloves and safety glasses! This stuff can hurt your skin. You should also work in a place with good airflow. Open a door and set up a fan to move the air around. Trust me, you don’t want to breathe in the smell of these chemicals.
Put on enough rust remover so that you can spread it out evenly and wetly with your gloves. Don’t forget the sides and miter slots. Make sure to cover everything, but watch out that the stripper doesn’t get into the saw’s work.
Follow the directions on the product you use. For example, the chemical on mine said to wait 20 minutes before taking it off. Use a rag or paper towel to wipe off the rust remover after the time is up. The dirt you get rid of will be rusty brown.
The process should be repeated until there is no more rust to be seen and the chemical that you wipe off is gray with steel instead of orange with rust.
Step 3) Ensure that the Bare Metal is Clean:
That orange and brown rust on your table saw might not be gone, but the table might still not be clean and smooth. Use a metal polish or rubbing substance and a buffing wheel to get rid of the rest of the rough spots. As a drill bit, you can use either an orbital buffer or a sharpening arbor.
Make sure that the things you use don’t have plastic in them. Silicone will stay on the table and get on the wood you cut, which will make anything you paint look bad. Take a look at the chemical’s MSDS sheet and see if it lists “siloxanes” if you’re not sure if the product you’re using has silicone in it.
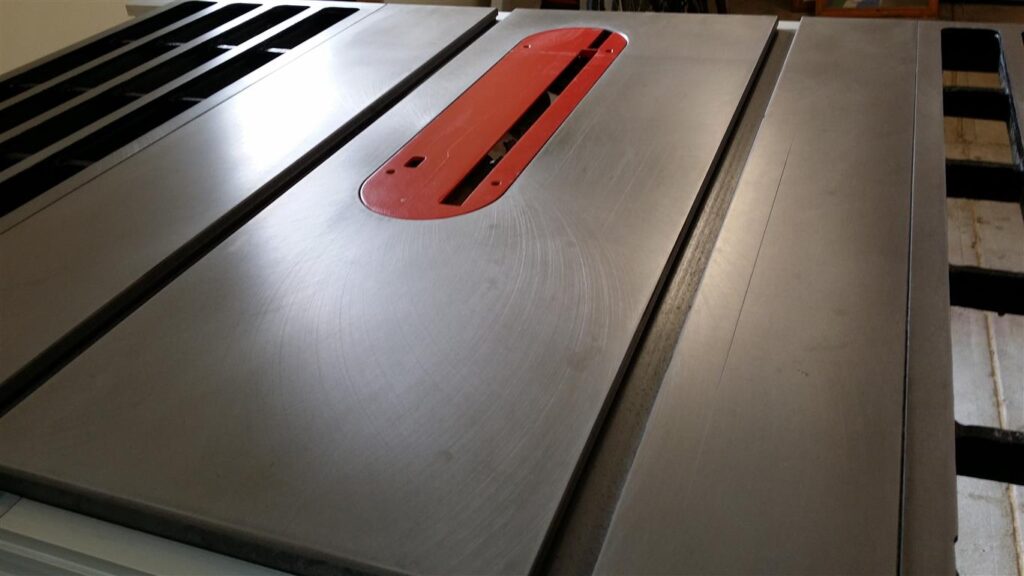
Step 4) Using Wax:
Once you are done polishing the table’s surface, use acetone or another cleaner to clean it until the rag comes off clean. This will get rid of any chemicals that might still be on the table and make sure there is nothing on the surface that could react with the wax coat. Once more, don’t forget the sides and miter slots.
Once everything is clean, use wax to protect the finish and make the surface smooth. Many people who work with wood will tell you to use Johnson’s Paste Wax. This item is offered as a floor wax.
Use the wax the same way you would wax a car. Cover the whole area with wax, wait 15 to 20 minutes (you’ll see a cloud form), and then wipe it off.
To make sure that all of the machining marks and surface flaws are filled with wax, do this process at least once more. This is because you are adding the wax to bare metal for the first time.
Step 5) Put the Table Back Together:
After giving the surface a nice coat of wax, you can put everything back on the table. When you put everything back on, it’s a good idea to clean it. We waxed the table with the same rag, so everything got a thin layer of smooth wax.
Put your fence back together, put in your blade insert, etc.
Step 6) Have Fun!
Once everything is back together, you can use your saw again. Step back and be proud of the great job you’ve done!
Don’t let water touch your saw. This will keep it from rusting again. In a normal garage or workshop, this is hard to do, but there are things you can do to lower your risk.
It’s best not to put drinks or other things that might be wet on top of the table. Also, you should put on a new coat of wax every so often to protect the surface.
If you take good care of your saw, its new finish will last as long as the tool does and do its job well. Have fun!
Simple Suggestions to Protect Your Table Saw:
These tips will make any table saw last longer, and they work for all of them. Let’s look at how to protect the table saw in more depth.
1) Manage the Humidity:
A big part of the rusting process is humidity. Rust usually needs air and water. Both of these things are part of the normal world. For some reason, humidity can rise, which can cause metal surfaces to rust badly and combine with the humidity.
So, if you don’t want the table saw to rust, you should put it somewhere with low humidity. A dehumidifier can be used to lower the dampness in the room. This is great for use in your workshop and will help keep things from rusting.
2) Make Sure the Tool is Dry:
Even though the humidity is low, you could still get the tools wet by leaving drinks or water on the saw table. You can see that there is some rust on the surface if you don’t clean it right.
You might leave the tools out in the rain by accident. Putting coffee or ice on the surface of the tool will make it rust faster. In other words, the tool should always be dry.
3) Use Coatings that Protect:
If the tool gets wet or humid, it will rust right away. Putting a covering on the tool’s surface will slow down the rusting process. Any wax can be used on the surface, and oils and sprays can be used to block the airflow between the surface and the wax.
You can use oils, wax, or any other covering that keeps air from getting to the steel surface.
4) Utilize a Metal Detector:
Metal detectors should be used when working with old wood. Because steel things like nails, pins, and other things can be inside used wood. The steel will quickly wear down if it comes in touch with the saw blade.
Using a metal detector will protect the saw blade and keep you from getting hurt. It’s also very important for jobs that involve finishing the workpiece.
The nails on the outside are easy to cut off if you see them, but you won’t be able to see the ones on the inside.
5) Cover the Blade:
Every time we use a saw blade, it might rust from water, get hit by something, or fall to the floor, leaving one or two teeth dull. Any saw blade cover around the blade is better. If the saw blade hits something or rusts, the sawblade cover can keep it safe.
6) Remove the Dust:
Dust is what’s left over after cutting wood. When dust gets everywhere, it can cause a lot of trouble. The following problems can be caused by sawdust.
- The motor getting too hot
- Stop your mechanical moves.
- Ligning melts
- Raise the tolerance.
- Slow down the cutting
- Making burn marks
- Having trouble cutting
When you use the table saw, you can also use a saw blade guard. Stopping the sawdust and chips from going everywhere will be easy.
7) Use the Right Safety Gear:
Both the cutting machine and the person using it need to have the right safety gear. Users will mostly find it useful. You can see unexpected damage to both the people using the saw and the machine itself if you don’t use safety gear.
So you should dust off the table saw. If not, it will cause a lot of harm. You can keep the saw machine clean by making a good method for getting rid of dust.
8) Put a Cover On your Table Saw:
The table saw should be closed with a cloth when not in use. It needs to be waterproof. The table saw can get wet when we store it. It may be rusting. When putting a cloth over the saw table, make sure to cover the saw blade and any other sharp edges. Because it could do a lot of damage to the cloth.
Tips to Keep Your Table Saw Surface Clean and Rust-Free:
Products for Lubrication
There are several good lubricants and protectants on the market that are made especially for saw tables. Fine woodworking tool stores should have a few different kinds of tools for customers to choose from. Don’t worry if you don’t have any car wax on hand when you set up your new pride and joy. Just look through the garage shelves and find an old can.
Paste wax made from carnauba is meant to protect your car’s surface from the weather, and it will do the same thing for your saw table. Use a wet sponge to spread it all over and let it dry for a few hours.
After that, use a clean cloth to smooth it out. If you think it needs it, put on a second coat. But make sure you get all the wax out of the miter gauges first.
To keep the table in great shape, you should add a new coat about once a month. This will keep the table clean and smooth, which will make it easy for the workpieces to move through the saw.
Regular Waxing Once a Month:
The tables of cheaper tools might be made of steel or even aluminum. Covering these surfaces won’t stop them from rusting, but keeping them clean and smooth is still a good idea. It’s a good idea to wax any fixed tool with a metal table surface once a month.
One important thing to remember is that you should never use items with silicone on your saw tables. They can leave a film that can damage some types of wood finishes.
Bottom Line: How To Restore Cast Iron Table Saw Top
Our cast iron table saw top guide concludes with six easy but effective procedures on how to restore cast iron table saw top. From rust and dirt removal to polishing and protecting, each stage rejuvenates the table saw’s surface, keeping it trustworthy and precise in your workplace.
The journey doesn’t end with restoration; preserving the recovered surface is crucial. Simple table saw protection measures like waxing help prevents corrosion and wear. Maintenance is vital, and simple habits can keep your table saw in great shape for years.
Wipe your table saw after each use, use rust inhibitors, and store it dry to maintain it clean and rust-free. These simple but important steps extend the life and effectiveness of your table saw.
Restoring and maintaining your cast iron table saw top is about investing in the quality and precision of your woodworking projects. You can care for your table saw and keep it a reliable creative tool by following these tips and adopting proactive behaviors.
FAQs about How To Restore Cast Iron Table Saw Top
What is the best way to keep the top of a cast iron table saw safe?
The only thing your saw will ever need to keep it from rust! This is a revolutionary new recipe with added graphene that keeps your cast iron tool away from damp air, keeping it safe from rust and corrosion. It also won’t scratch, so the surface of your tool will stay smooth for years to come.
Should you Polish Cast Iron?
There are six things you should never do to your cast iron skillet.
As part of the manufacturing process, older skillets used to be polished before they were sold.
But when cast iron sales went up in the 1950s, many makers stopped polishing the skillets. So, the surface of most current cast iron skillets is a little bumpy, and it can only be made smooth by using them often and letting them age.
How Do You Make Cast Iron Black?
Invert the pans and put them on the top rack of the oven. On the bottom rack, put aluminum foil to catch any oil that drips off the pans. Put it in the oven at 450 to 500 degrees F for an hour. Let it cool, and do it again if you need to get the standard black patina.
Related Posts: